Sunday, December 25, 2011

Merry Christmas to all and to all a Good Night!


Hopefully all my family would have received their cards 
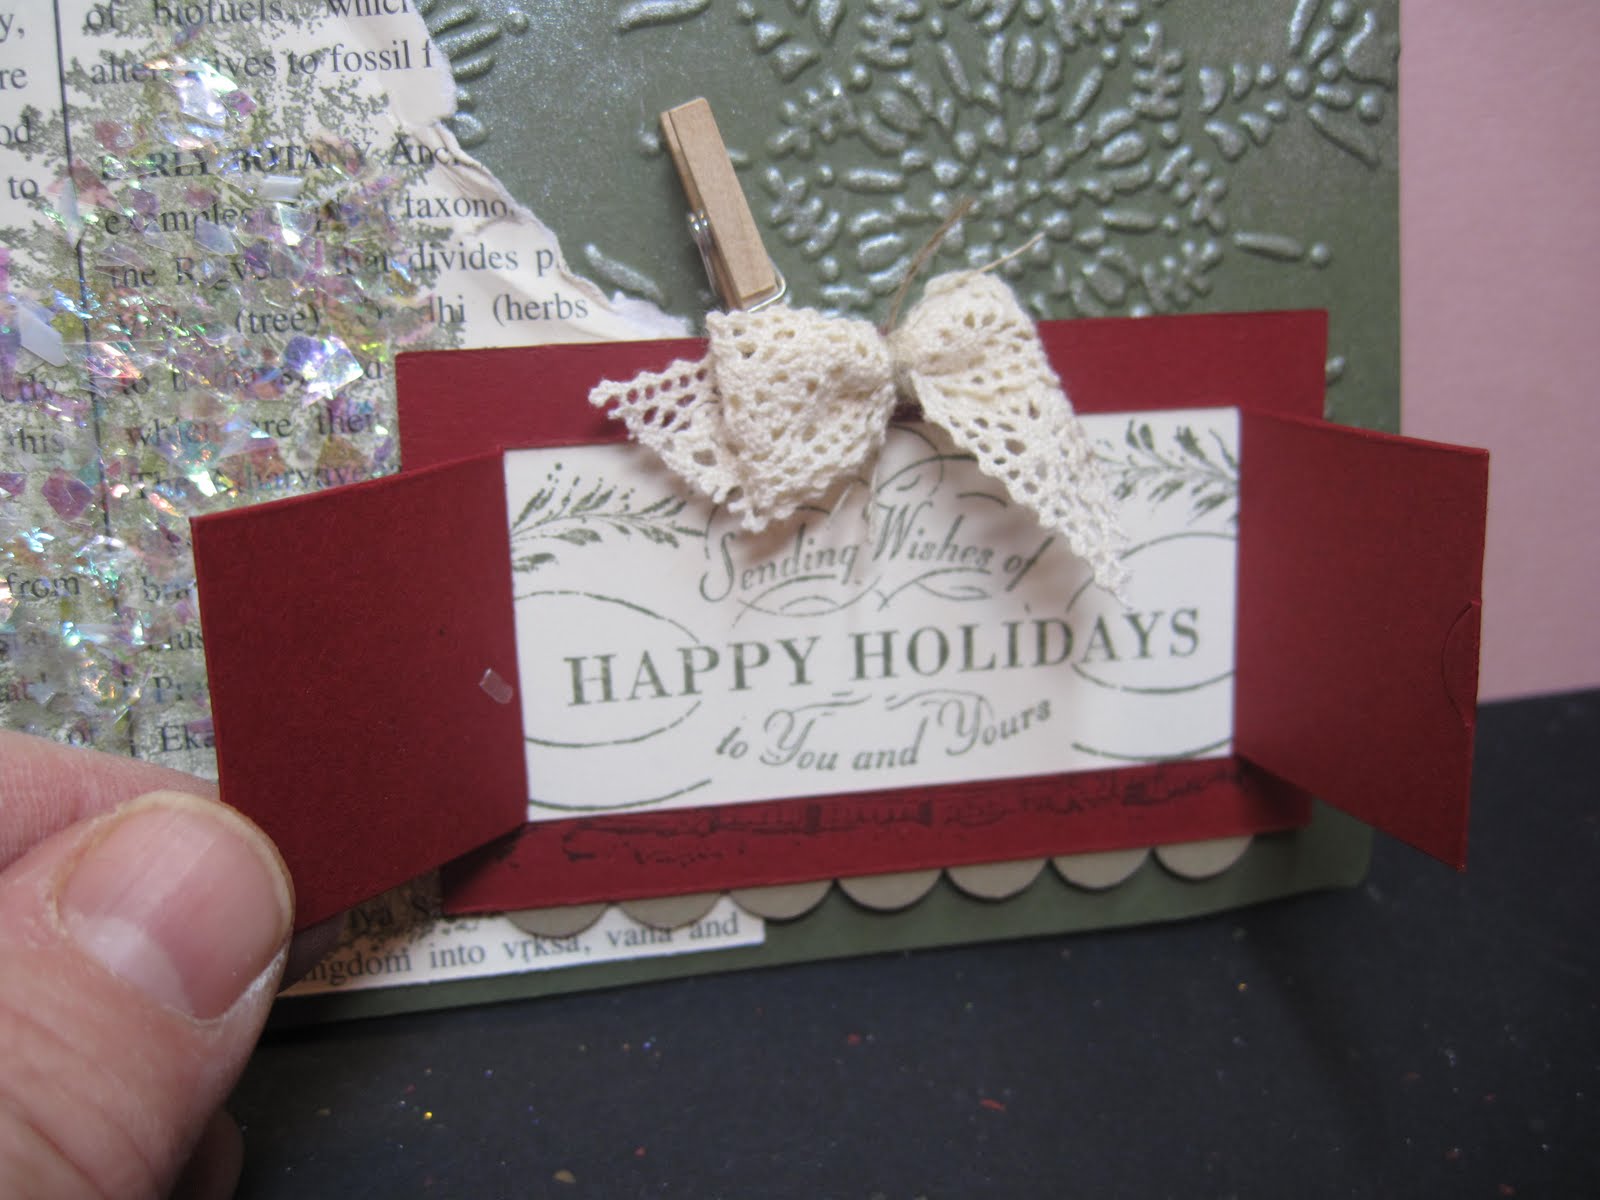
for now so I thought it would be safe to post- this is my Christmas card for this year- I have 3 boys and with an engineering husband they really like moving parts so I try to make somewhat of an interactive card every year and this year I decided to do a water fall card.
Figured out the dimensions based on the pictures I wanted to print out. I was also tired of having to photoshop a picture to send out every year and thought separate pictures would be best. Basecard is whisper white with real red embossed with the Snowburst embossing folder (love the geometric pattern!). Take of strip of Holly Bouquet DSP - it has glitter on it - so sparkly! Took a piece of limeade CS with corner rounded for the right pull out side , scored it to make the waterfall- instructions are everywhere- here is one from Splitcoast Stampers- http://www.splitcoaststampers.com/resources/tutorials/waterfall_card/ . Added the pictures printed out wallet size. The cover image and sentiment is Beautiful Season from the IB&C. The image was stamped in black stazon and watercolored using the watercolor crayon then glittered with dazzling diamonds onto shimmery white CS.

Tyler, Kyle and Dylan in order and the three of them during camping this summer with sentiment from Four the Holidays set beneath. Some faraway friends got a short letter I attached to the back for a little update.

I attached a little handle made of roundtab punch- could not live without it!- 2011 stamped with Calendar Alphabet & Numbers in red and tiny snowflake from Snow Swirled in bashful blue.
The pictures have JOY on the right side bottom if you can see it - did not work out as well as I liked but it's like a secret message....
Happy Holidays to you All! and may the new year be filled with good healthy, happiness and good fortune for you all!
with much thanks and Love,
Lynda

Saturday, December 24, 2011

Christmas Cards from friends


Some adorable Christmas cards from friends using punches and cut outs I thought you may enjoy- The penguin is from Mercedes, my most amazingly talented friend and her adorable family- her blog http://mercedesweber.blogspot.com/ The Elf is from Marisa- It is SO CUTE! I had not seen this one before and it cracked me up. The Santa is from Bonnie, one of my workshop regulars. I am SO proud of her! Have a Happy Holiday season and may you all be blessed with friends as lovely as mine!

Sunday, December 18, 2011

A simple thank you


I can't believe Christmas is only a week away- This whole weekend was filled with just Holiday Card making, taking pictures of the kids- no group pictures this year to photoshop!- for the cards, putting the cards together and addressing all the cards. I am pretty awful with keeping up with friends- so many dear friends all over the world and life just gets in the way of staying in touch. So once a year I send out cards to family and friends from school to let them know that I am thinking about them. My birthday is right before Christmas so I never get a chance to relax with everything that needs to be done no matter what I promise myself at the beginning of the year- it always takes longer than I imagined......

but handmade cards are a labor of love.....much that is unspoken.


This is a little card I made using the Borderline (one of my current go to favorites from the Stampin Up IB&C) and Curly Cute sentiment set. Ink the stamp using the certainly celery ink then use Lucky limeade and artichoke markers to highlight some leaves then huff and stamp onto whisper white CS. Layer it on to Lucky Limeade CS and mount the whole strip onto whisper white CS. Stamp the sentiment of your choice using Lucky Limeade and a Clean and Simple almost one layer card you can whip up in a jiffy!


Do take a breath this holiday season to enjoy it for what it is!

Lynda

Thursday, December 15, 2011

Only Ten more days 'til Christmas


This was one of my favorite sets from the Holiday Mini but it was really a Valentine's set and hard to demo for my workshops when things are all so hectic and no one can think about anything after the holidays so I turned it into a Christmas card and I thought it worked. It also helps that it was a 6:30 in the morning the morning of the workshop inspiration and it just sounded good after being up all night. Take the heart from the You are Loved set and stamp it using the real red CRAFT pad- it is a pigment pad so it stays wet a lot longer to allow you to heat emboss it using the iridescent ice EP and it is gorgeous IRL ! Wrap the white cardstock with the cherry cobbler bakers twine. Stamp the sentiment image with love in the center from the same set with real red craft and emboss again with iridescent icet. Punch it out and mount it on the card using dimensionals. Stamp Merry Christmas from the teeny tiny wishes set- and again the red craft inke then heat emboss with iridescent ice to make EVERYTHING sparkle! Add 2 rhinestone on either side and easy peasy christmas card using what was originally a Valentine's image- I love it still! Use the same layout but keep the image with Love sentiment for Valentine's day. No one will ever know!


Wednesday, December 14, 2011

Eleven Days until Christmas

I saw a variation of this in the Stampin Success - a monthly magazine for demonstrators. I liked the color combination but used the Box #2 to make it instead out of Crumbcake CS beacuse I did not have enough kraft gift boxes to use for the workshop. I used a small strip of DSP topped with white CS punched with dotted double scallop ribbon punch.

Diecut snowflakes from Northern Frost with Shimmer white and real red CS and add a rhinestone in center to add some sparkleand mount it on the box with a dimensional to add some depth. Punch a tag - stamp snowflake from Bright Hopes and sentiment from Teeny Tiny Wishes and tie it on with linen thread and voila! Another easy little box for someone special.

.

Tuesday, December 13, 2011

Twelve Days until Christmas


We made this at a workshop and I loved the idea of incorporating fabric to decorate cards, packages and other items that we are using. Really mixed media. The new Spring Mini has big shot dies for Dresden plates that I am coveting - With the fat quarters they are now selling with matching stamps, Stampin' Up is bringing my love of fabric and paper together in a beautiful way.


The cherry cobbler Fancy favor box is covered with Deck the Halls DSP diecut with Tasteful Trim die. Punch 2 holes and thread Artichoke seambinding to the front and use a big button to secure.


Sentiment is from Tags til Christmas colored in with Cherry and Old Olive then punched out with scallop square.


A friend thought that this was a nasty sentiment but you just have to know my children!

Monday, December 12, 2011

On the Twelfth Day of Christmas.....


Another bitty box.


One of my friends thought was a bit "Gaudy" but I liked th idea of the little poinsettia made with the Boho blossom punch to fit the postage size door to the peekaboo frame.


Diecut the box with Cherry Cobbler. Diecut the peekaboo frame using Baha Blue. Take a good size piece of whisper white and stamp an image from 25 & counting. Center the image on the peekaboo frame, adhere the frame on top then trim the whisper white to accent the frame.


Punch Boho blossom with cherry cobbler. I tried to glue on the fingle bell with different glues but none worked. Finally just used a needle and linen thread to thread it on and tape it on the back. Added leaves made out of same blossoms. Added some Dazzling Details on the leaves to add some sparkle (looks better in real life though...) then 2 way glue pen and champagne glitter to add that extra "Gaudiness"!

Sunday, December 11, 2011

On the Eleventh Day of Christmas...


Stampin Success is a monthly magazine from Stampin Up and in the November issue this year had a cute little box with colors and motif I loved so I cased it to make this little bag using the fancy favor die.


Take a 12x6 piece of whisper white CS and diecut with the fancy favor box die. Stamp the images from Pines & Poinsettias in real red.


Take a Real Red textured CS and die cut with tasteful trim die to get the perfect big scallops. (LOVE this DIE for the rickrack too!)


I really bought this stampset because I LOVE the pine cone image. Colored it with markers using soft suede, old olive and real red onto white CS and punche it out with a circle punch. Using 2 way glue pen, apply dazzling diamonds to the pinecones and to sections of the bag ot add sparkle. Add a pool party Scallop circle and a piece of red ribbon looped over once and a simple little bag that looks like you spent some bucks on it for those not so small sized gifts......

Saturday, December 10, 2011

On the Tenth Day of Christmas.....


A simple little box using the Peekaboo frame and Bitty box.

Diecut the box in Cherry Cobbler. Punch 2 Doily Triple Layer in white and cut in half. Adhere each half to behind the frame. Stamp another white piece of scrap white CS with the one from 25 & Counting in cherry cobbler and add a rhinestone to the center. punch another piece of white CS and stamp Enjoy from You're a Gem in Cherry.
A quick and easy box for a little something for someone.....


Friday, December 9, 2011

On the Nineth Day of Christmas my good friend gave to me.....


Tami my upline sent me this card using the Peekaboo frames die and I wanted to share it with you. Base card is artichoke, embossed with Northern Flurry EF and highlighted with shimmer paint. Then First Edition Specialty paper was stamped with the tree from Christmas Lodge set, distressed and mica flakes applied on top to add lots of shimmer. The frame was cut out of Cherry Cobler with christmas lodge stamped on top.


Inside the frame is the sentment stamped in artichoke. A ribbon was tied from the Chantilly ribbon and clipped on with the mini clothespin.


details of the mica flares- just lovely....

Thursday, December 8, 2011

On the Eighth Day of Christmas my good friend gave to me.....


Margery made these most darling tags using the Designer frames folders. The card if a long piece of CS folded over to make a little card. The one on left is stamped with Pennant Parade. Both tags are punched out with pennant builder punch. the santa hat also used the square scallop punch to make the white trim. Pompoms from the local craft store and some really quick and cute tags for the holidays.


Wednesday, December 7, 2011

On the Seventh Day of Christmas


The Christmas Lodge makes me
feel so Christmas-sy- singing "there is no place like home for the holidays..." white Christmas and all that we never get in California- that is one thing I really miss about my old house in Ohio is sitting by the big bay window next to our Christmas tree looking down at the miles of snow and the tiretracks made by the few cars that dared to be out. Sticking your tongue out and letting the snowflakes melt. It's a ritual of childhood that I will always remember....


Stamped Christmas Lodge in Navy, the made an stencil with an oval cut out from the scallop oval original big shot die - I taped the scallop back on so I only used the oval- with bashful blue sponged around the house. I stamped the sentiment below the house, then the tree twice. Stamped the sentiment again in red and cut it out and layered over a red streip to make it pop. I added some dimensional snow with white liquid applique and added dazzling diamonds glitter on top of that and on the trees.

Corner round the cardstock and layer it onto a real red basecard- and it is almost a 2 layer card that has lot so dimensions that would mail easy for the holidays. So, if you haven't started your greeting cards yet, get your bottom going! before they become Happy New Year cards.....


Lynda

Tuesday, December 6, 2011

On the Sixth Day of Christmas


I had this stamp from Stampendous of these poppies that I just love- but it was a bit plain until I put it on a back ground of poppies embossed on white with SU's flower garden die. I am giving a set of these in a box out to a girlfriend who loves Provence.


Stamp the image on watercolor paper using memento or Stazon black and color in as shown. Mount the piece onto real red CS and distress around the edges. Mount it onto another white CS that has been embossied using the flower garden die as shown.


Easy yet touchingly hand made gifts for your friends.


enjoy!


Lynda


Monday, December 5, 2011

On the Fifth Day of Christmas


An Easy Christmas Card totally CASED from Margery Chen- Base card is white with Merry Chsistmas from Hand penned holidays heat embossed using silver EP.


Stamp Lovely as a tree in Garden Green and use 2 way glue pen to add dazzling diamond glitter to the trees and base- so sparkly but hard to tell here. Tie a red ribbon - this one is retired- around the card and voila - a card you can make in just a few minutes. You can make 10 of these in no time to send out to your friends and change out the ribbon to some color that you may have on hand.....


Thanks Margery your friendship and your Lovely (as a tree) Card!

Sunday, December 4, 2011

On the Fourth Day of Christmas


The matchbox die is one that I go to ALL the time to package a small gift and paired with the transparent wrapping and a pretty ribbon, nothing could be more elegant.

Wouldn't you LOVE to find one of these on your desk during the holiday? filled with chocolate, a ring or any other jewerly, set of tags to use at Christmas, it is a possibility with endless options.

The candies were wrapped with Holly Berry Bouquet DSP.


Base box is real red with transparent sheet to cover and real red satin ribbon with an antique brad - these are about 30 cents a piece and it just add that 'je ne sais quoi' that finishes it. "LOVE IT! " - you have to say it in that high pitched Miss Piggy voice....


Lynda

Saturday, December 3, 2011

On the Third day of Christmas


Do you remember my pumpkin from Halloween made out of 2 milkcarton boxes using just 3 sides? Well I complained that the bottom of that did not lay flat but then I thought for a christmas ornament that would be perfect so here is my milk carton ornament. I used gold paper and used soft suede and then versamark to ink up to add some color then with iridescent ice EP to add some sparkle- Tried to do it plain without any color and it made the decoration hard to see- using the swirl from Creative Elements set. Then I added some sparkle using the basic rhinestones.


I had some hairpins and beads/pearls from the pretties kit- remember that? I loved that kit, sigh!- and added that to the bottom to dangle after corner rounding the bottom panels and taping it closed. Used the hole punch and the gold ribbon- retired from SU also to tie it at the top and it looks so pretty on my tree!


Lynda

Friday, December 2, 2011

On the Second day of Christmas...


This is a favorite gift to make for many occastions. Take a composition notebook from your local store- usually sells for under $2 or so- and cover it with the DSP of your choice. Here I used Beyond the Garden - and adhere it using the sticky tape around the border and tombow multimono liquid glue and it sticks realy well. I also use the sticky tape to adhere the ribbons to decorate and hide the seams.


I stamped Fabulous florets and sentiment in Not Quite Navy to break up all the yellow.


I continue the ribbon from the front vertical seam cover all the way around - keeping it loose from the top of the cover and attach a button as shown to use as a bookmarker.


I tied a daffodil ribbon and then gluedotted the ribbon to the button but you could sew it on as well- which may be stronger.


Easy gift for you to make for one of your favorite friends or teacher- and it also forces you to use up all those designer papers you have been hoarding- and you know who you are!


It takes no time at all - so make a few for easy gifts this holiday season.


Lynda


Thursday, December 1, 2011

On the First Day of Christmas...


I saw this little clipboard memopad and pen set at my local Michaels while looking for some quick gifts to make for a gift exchange for $3 and loved the memo pad and it was a perfect match to our melon mambo but just didn't love the funky 60's pad or pen so I tooke some Beyond the garden DSP and covered the front- did take some care to cut around the clipboard carefully - and glued it down with with our liquid multimono glue and sticky tape around the edges and presto perfect coverage. I did cover the back with another piece of same DSP in different color to finish. I also took a tiny piece of same DSP to cover the pen- put sticky tape on all four sides of the DSP after measuring and covered it- the pen clip is way at the top so just needed a rectangular piece which was easy peasy to do.


It did look a little plain so I punched a hole using my cropadile and like butter! it made the hole on the top of the metallic clip, added the flower brad with some crystal jewels, curled the brad legs around to hold it in place and a quick and easy home made gift for someone on your list!


You could personalize it with the recipient's initial stamped on the memopad but I kept it plain as I did not know who was getting this at the gift exchange....


Lynda