Wednesday, October 31, 2012

Holiday Frame with stippled blossom


I think this Stampin Up Holiday frame is so pretty, I did not want to relegate it to just holiday cards.  I just got my Stippled blossoms set that I have been wanting so I used it to accent the frame.  Base card is pink pirouette embossed with the holiday frame and then I stamped the flowers in pink pirouette and melon mambo on whisper white and then embossed the oval from the Designer Frames Folder, then diecut it with one of the classic oval die from Spellbinders (which just fit the outer oval perfectly).

 I then stamped the sentiment from Made for you and stamped the little bud. The leaves are Celery and Limeade, punched it out with the Oval punch  (of course it matches perfectly on the inside ) and except for the cutting of the flowers, it was perfect.  I am working on my projects for my next workshop and I will post some of them after the party in a few weeks.

After I stamped the flowers, I wiped away the inside with the blender pen to add chocolate chip stamens with a marker to get an extra pop.

Lynda


Wednesday, October 24, 2012

Fall Leaves thank you card

My little thank you card for this month was one using the leaves made with Autumn accents dies.
I diecut the leaves using the daffodil delight CS, scored the veins using the scoring tool and sponged old olive, cajun and egglplant and stamped the waterspots from French foliage with the eggplant direct and stamped off, crumpled the corners a bit and put a sticky strip in the center to adhere to the old olive CS embossed wtih the wood grain.  Punched out word window and stamped the sentiment from Made for you in eggplant onto the vanilla basic CS .  It looked like it was floating do added the linen thread around really ties the elements together. A simple little autumn card. 
My kids had to peek around the leaf to see if it was real or not... tee hee.

Tuesday, October 23, 2012

Angry bird Pig Queen for Kyle

 Ok so I recycled this card idea but Tyler quickly corrected me and said I got it all wrong.
The pig queen does not get flown, they are either in the box to be hit by the birds or I guess there is different version where the queen is flying on a rocket so I had to redo the card.

Using Lucky limeade punched the face with 1 3/8 circle punch.  The snout is free cut since I had no oval that fit that size.  The rocket is Modern label- Tyler told me later it should have been a green soda bottle so I colored it in. The final sentiment is non SU.

Monday, October 22, 2012

Angry bird birthdy card

 Dylan said he wanted an angry bird theme but changed his mind at the cake shop changing it to Ninjago cake but still wanted a angry bird favor so this was his birthday card.  Real red base with bashful blue on top.  Diecut PTI grass in Old Olive.  Punch word window in chocolate and stamp woodgrain .  Make the lattice. Diecut the cake (sizzix) and color in with markers.  Bird is made from 1 3/8 circle in real red, same for the white belly piece.  the beak is summer sun (retired)  mount with dimensionals and add the flight with the white signo gel pen.   I have been getting instructions from Tyler on how to make
these cards concept correct!

Thursday, October 18, 2012

Billboard letters HI

This card was inspired by a card I saw in the Scrapbooks etc magazine where they used the negative of the dies to spell Hi, and I thought it was so cute.  I took Stampin Up Billboard Sizzlit (retired) and diecut it twice with white and real red.  Punch a 2 1/2 inch circle in a real red CS and layer the sentiment behind it so it will show. (hardest part was sticking the little letter insides so it would form a complete letter- see the letter g) then I punched some pennants using the Petite Pennant Builder (only went up 1/2 way up the punch where the bend it to get little banners) Summer Smooches DSP and some Subtles DSP and layered it all over bashful blue and I don't know why but I just love it.  Today is my exam so I am posting this early. If you see this today, please pray that I pass my exams!!!!

Tuesday, October 16, 2012

Another Wonderful Winterland CASE

Base of whisper white CS base and use a scrap piece of paper to cut out a curve you want and stamp the Lovely as a tree in Midnight Muse. Now these new stampsets are not as quick drying as the old formulation so I used that to my advantage by using a piece of sponge with the mask still in place rubbed the stamped trees to get a blue smudge-y background which totally works.  Then stamp the little guy in black (I use memento black but staz-on will work too so the colors do not run) and then colored it in with Bashful blue and Real red and blush blossom for the face. Stamp another little guy and cut out using Eclipse paper or some other thin piece of paper to create masel.  I then used the curves of the mask to lay it down on different places and used Bashful blue to add some more colors to create the valleys in the snow and the little skating pond. Stamp the sentiment from Friendly Phrases in midnight muse and use 2 way glue pen to add sparkle over the trees and top of the snow banks with dazzling diamonds. So cute!  Again, totally cased from Janine Tinklenberg http://stampspaperscissors.typepad.com/stamps_paper_scissors/2012/09/two-one-layer-cards.html

Monday, October 15, 2012

Winter Wonderland CASE

 So I made whole bunch of these cards- I thought they were just so stinkin' cute!

Again, took a whisper white CS base and used a scrap piece of paper and cut out a curve I wanted and stamped the Lovely as a tree in Midnight Muse. Now these new stampsets are not as quick drying as the old formulation so I used that to my advantage by using a piece of sponge with the mask still in place rubbed the stamped trees to get a blue smudge-y background which totally works. I then stamped the little guy in black( I use memento black but staz-on will work too so the colors do not run)  and then colored it in with bashful blue and real red , Crumbcake on the feet and hair and blush blossom for the face. I then used the curves of the mask to lay it down on different places and used Bashful blue to add some more colors to create the valleys in the snow. Stamp the sentiment from Friendly Phrases in midnight muse and use 2 way glue pen to add sparkle over the trees and top of the snow banks with dazzling diamonds. Don't forget to add sparkle to the trim on the little kid's outfit!
Details on the coloring.

Enjoy!


Credits to Janine Tinklenberg at http://stampspaperscissors.typepad.com/stamps_paper_scissors/2012/09/two-one-layer-cards.html

Sunday, October 14, 2012

Case from Janine Tinklenberg


 I don't get a chance to spend a lot of time perusing through internet but I love this Wonderful Winterland set and wanted to use it for my next stamping party but I was not inspired by much of what I saw until http://stampspaperscissors.typepad.com/stamps_paper_scissors/2012/09/two-one-layer-cards.html  by Janine Tinklenberg. I love how she used the Lovely as a tree as the background which I think totally rocks it.
 So I took a whisper white CS base and used a scrap piece of paper and cut out a curve I wanted  and stamped the Lovely as a tree in Midnight Muse. Now these new stampsets are not as quick drying as the old formulation so I used that to my advantage by using a piece of sponge with the mask still in place rubbed the stamped trees to get a blue smudge-y background which totally works.  I then stamped the little guy in black and then colored it in with bashful blue and real red adn blush blossom for the face. I then used the curves of the mask to lay it down on different places and used Bashful blue to add some more colors to create the valleys in the snow.  Stamp the sentiment from Friendly Phrases in midnight muse and use 2 way glue pen to add sparkle over the trees and top of the snow banks with dazzling diamonds.  Don't forget to add sparkle to the trim on the little kid's outfit!


Friday, October 12, 2012

Make a Mitten make and take

The make a mitten set is so darling with its matching punch but i wanted the thumbs to be opposite on the card I was making and this makes it an easy solution.  Punch out 2 mittens, stamp the snowflake and the band with versamark and emboss with white EP and heat set.  Add cherry cobbler bakers twine behind the gloves and mount them using dimensionals on very vanilla CS diecut with Windows Frames framelits die.  Diecut another in lucky limeade and paper pierce using the Festive paper piercing pack.  Emboss the sentiment from Greetings of the season after stamping with versamark with vanilla EP then layer a strip of Candlelight DSP.  Punch out scalloped ribbon and splilt it in half to line the DSP as shown. 

Thursday, October 11, 2012

Googly Ghouls October make and take and Lin's card


   Because I became a doctor in 1987 and finished my training 5 years later I missed the window to be grandfather'd in for a never ending license and have to take an exam every 10 years (which I think is a GOOD THING!) but it does take a toll on the family and my extracurricular activities as I have to prepare for it.  So my projects for my workshop this month is really pretty simple.  This is one of the projects we will be making this week.  Take the Ghoulish Ghouls desinger kit (it comes with 10 glassine bags, 10 pieces of pumpkin pie twine and 20 preprinted tags you can embellish how you wish and a package of googly eyes-- so FUN!).  Emboss the bag with the spider web embossing folder.  Stamp the bat on the preprinted tag and add googly eyes. Put the twine through the hole on top of the tag and then make a bow from the twine and glue dot the whole thing in place. Fill the bag with candy of your choice.  You can also fold over the top and staple or punch 2 holes to loop the tag through as well.  Whatever suits your fancy.


I have downline friends that are amazingly talented. 
Lin Tsai made this card and we were all WOW'd at my last stamping party.  Love the layout, simplicity, really works well.  Thank you, Lin for sharing it with us!

Wednesday, October 10, 2012

Ornament Keepsakes embossed two ways

Another project from one of my parties.  Take the expresso base CS and emboss the edge with the Delicate Designs folder.  Take a piece of whisper white and stamp the trees from the Lovely as a tree set and the sentiment from Greetings of the season  in lucky limeade.  I stamped the Ornament using the Raspberry Ripple but it was so sopping that when I sprinked the clear embossing powder on it right away, it stuck and embossed beautifully (if you wait a bit, it won't stick)  - alternatively you can ink with versamark and then the dye ink pad but sometimes I find the color not as brilliant. Tie a white stitched ribbon and attach a crystal in the center to finish.  It may look a bit hard, but it's not.....

Tuesday, October 9, 2012

Toxic Treats with glittery spider web


I have been playing with the witch heat embossed with black EP on glossy and using different colors to highlight using a dauber.  On this one I used More Mustard in the center with Pumpkin Pie around the edges, highlighted it wiht silver glittery paper and mounted using dimensionals.  Take the base basic black card, emboss using spider web thyen highlight with silver pen and then add dazzling diamonds glitter with 2 way glue pen.  Tkae a piece of first edition DSP and accordion fold and then figure out where you want the accent piece to be then punch a hole through all the layers to make a stay put ribbon.  Another easy peasy card..

Monday, October 8, 2012

Field Flowers with Apothecary Accents leftover


When I made the Toxic Treats card for yesterday's project diecutting the Lucky Limeade paper, I made a point of centering it on a folded A2 card (it's not like I could have cut 3 out of a half a sheet of paper so if I was only going to get 2 out of a half sheet of paper it made sense that I could actually "use the negative".   I pierced the borders using the piercing template.
 Whenever I think about a card, I usually do a dry run with a left over copy paper folded into quarters and check out the proportions and colors before I actually make a piece which saves lots of good paper and frustrations.    So that's what I did here.  Used the color coach to get compatble color ideas (here Daffodil and Marina Mist.
Test out the colors and layout and if you like it then stamp it on a good piece of whisper white about 1/8 inch smaller all around.  After stamping it the way I wanted using Field Flowers, I mounted dimensionals on the front as shown and mount it behind the Lucky Limeade basecard opening.  A real simple card using the left over piece from another project.  Recycling at it's best! 
 

Sunday, October 7, 2012

Toxic Treats with eggplant taffeta ribbon?


I ordered this set on my first order from the new holiday catalogue. I loved the images that would make some really sophisticated cards and gifts- but as days went on, it just sat on my desk, waiting to be used.  Well, there is no better inspiration than  not wanting to study so I have happily wasted this morning making cards that have been floating around in my head for the last few weeks.

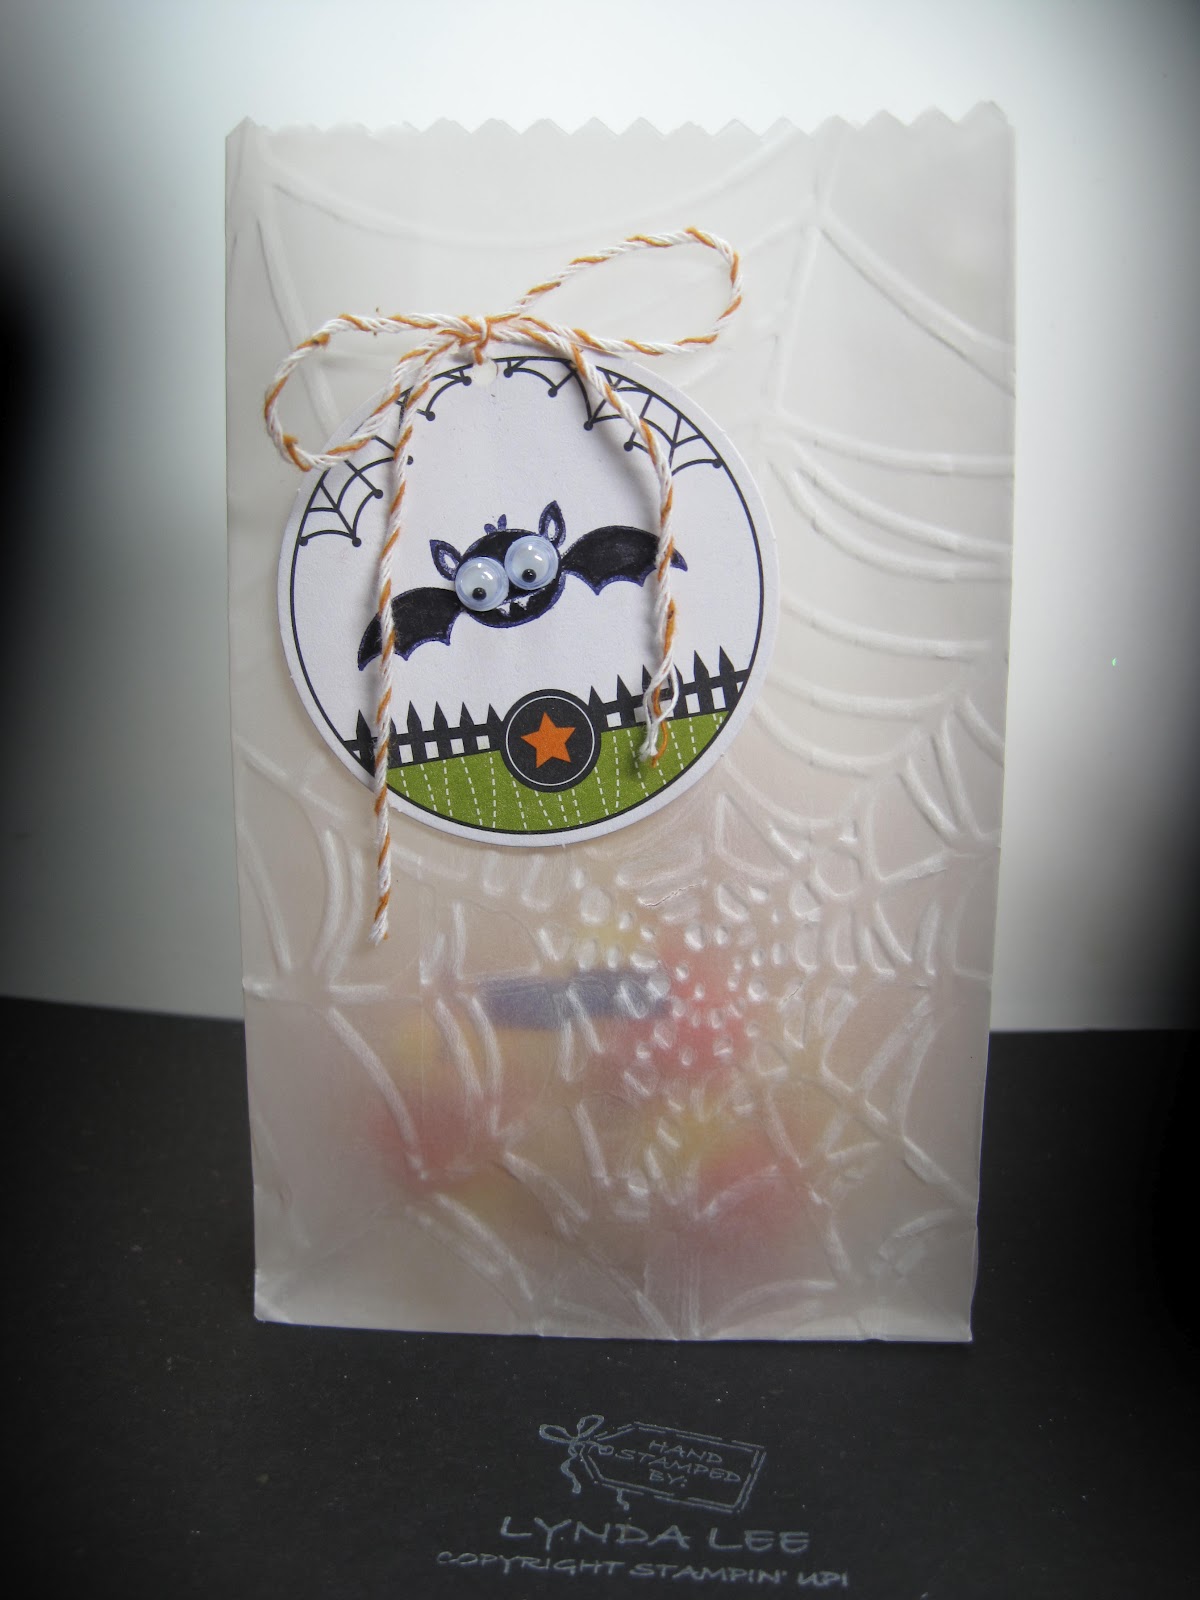
For the Witch center, stampt the witch image with versamark on glossy white CS then emboss with black EP then heat set.  Use a Post-it note and punch a hole and use a dauber to color iin the moon in pumpkin pie as shown through the hole.
Then cover the moon that has been colored with the circle that you punched out and colored the outside with elegant eggplant using a dauber as shown.
I wanted a matching taffeta ribbon but Stampin' Up does not sell one in that color. No Problem!  I know there are tutorials on using reinkers and a plastic container and dipping the ribbon and letting dry blah blah blah-  too messy for me.  Just use the same dauber to color the white taffeta ribbon as shown (make sure you color in both sides of the ribbon)  and Voila!  Eggplant taffeta ribbon in no time flat- no drying time, no nothing. Easy peasy the way I like it.)
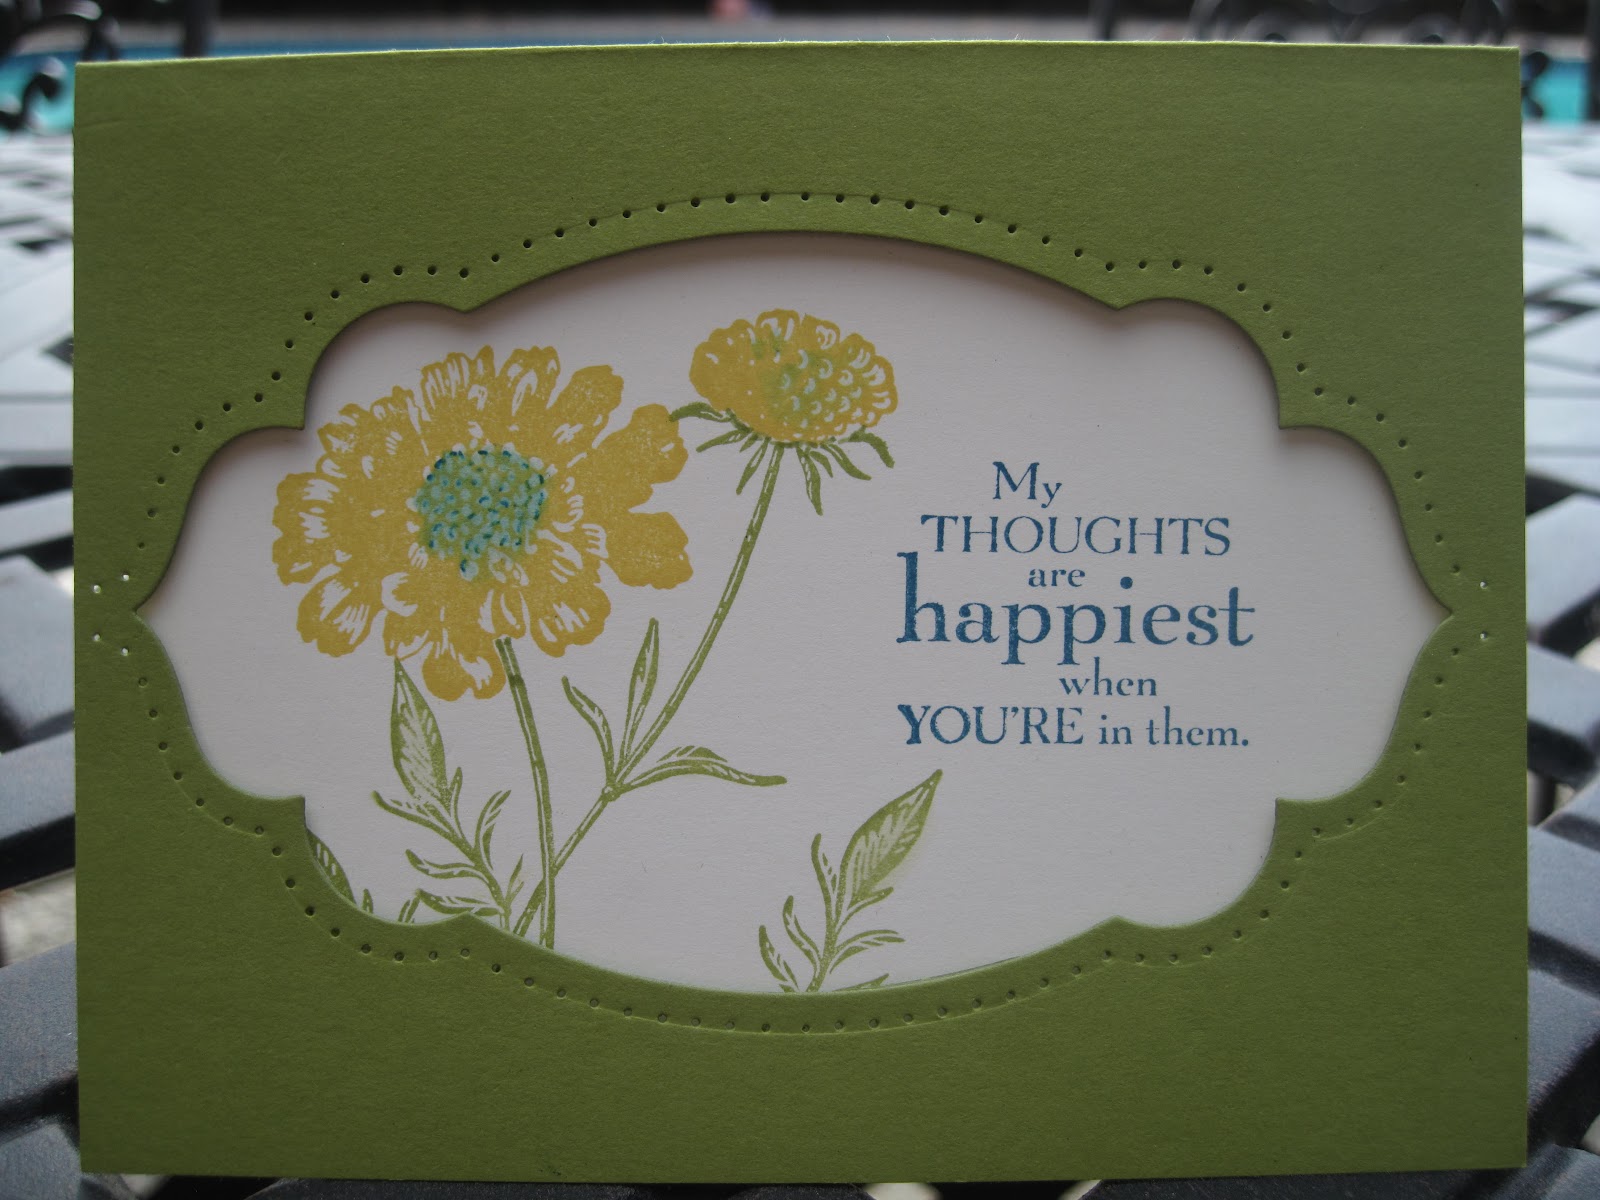
I also wanted to layer the black apothecary accent framelet diecut piece behind the lime but I had to cut it as shown to the left to make an evenly  layered piece.  I did stamp the spider web from Wicked Cool and spider from Out on a Limb(retired SU) to add that "little something extra". All in all a fun little card.  Drats, I have to get back to my studies......


Saturday, October 6, 2012

Perfectly preserved- corns in a row


I love the look of Indian Corn. It really signals that the autumn is in full swing!   Take a base card of crumbcake, emboss the delicate designs and stamp the sentiment from Loving Thoughts in Olive.  Stamp the corn with daffodil ink pad then ink usikng limeade marker, more mustard, pumpkin, Cajun Craze  - the middle one was done with chocolate chip but looked almost purple- weird.
Then HUFF then stamp. Diecut the corn then attach as desired using dimensionals.  Really easy cards but oh so cute!

Friday, October 5, 2012

Splitcoast Sketch Challenge 405

SC405 challenge is such a great simple layout I had to try it out.  It's just that I did not have a large selection of "large" sentiments to use.  Then I found this one I had from CTMH and then remembered this little girl from MFT (isn't she sweet?  Some people collect dolls, I collect sweet little girl stamps- tee hee)   Stamped her on whisper white with Memento black colored her in with crumbcake, bashful blue and real red and Blush Blossom for skin. Paper pieced the umbrella out of Crumbcake, and then the jacket using the Summer smoochesDSP.  The words were stamped with Bashful blue and real red. Layered the white CS on the same colors (I find repetition is something I like to do- use whatever you are using 3 times and it creates a better balanced card. - I tried to layer the white on just the blue and it seemed wrong somehow - with the hint of red, it seemed more "balanced" - just sayin'. )

Perfectly preserved apple basket

I like to add a little thank you card to each order I receive when I deliver the orders. This was a quick card but very sweet.  I was looking for a basket to put the apples in but every thing I looked at was too big or small. Then I realized that the jar could be a basket!  I diecut it, then used the bottom of the die to cut the jar again along the top to create the perfect curve along the top of the basket.  I cut another piece to lay on top as the border.  Emboss using the woodgrain folder to add that rustic feel. Tie a linen thread with a bow.  Stamp apples and leaves with real red and limeade and diecut out.  Layer over a whisper white piece layered on limeade.  Stamp the sentiment with soft suede as shown.   It should say thanks a bunch or thank you from my core but I used what I had.....

Thursday, October 4, 2012

Easy Tea Shoppe thanks

Last time I orderd from Stampin Up I got this little sweet notecard enclosed which I thought was so cute, I had to case it for a card.  

Using base card of crumbcake- emboss with polka dot EF.  Take a square of white CS, stamp the teacup from Tea Shoppe in Limeade, sentiment from A Word for You in Soft suede then punch a little flower from Itty Bitty Shapes in daffodil, add a pearl in center, distress the edge, add limeade layer distress that too then add crumbcake taffeta ribbon diagonally and a easy peasy 5 minute card. 

Wednesday, October 3, 2012

Googly Ghouls Case


I saw a card by "Holstein" on splitcoast and thougth it was so cute, I had to make a version of it.  I love the use of the postage punch and the layout.  Take a base card of white then layer a piece of pumpkin pie DSP on the left and a limeade CS embossed with spiderweb and then layer a zigzag diecut to the left as shown.  Stamp the figures in scrap piece of white and punch it out and layer it on black and color it in as shown.  Versamark stamp the spider and emboss in black then cut it out. add a fishing line to make a dangling web and use dimensional to adhere that and the spider in place. 

Stamp in versamark and emboss boooo in black EP then color in 2 of the OO's with white signo gel pen to make it look like eyes.  So cute!

Monday, October 1, 2012

Easy Googly Ghouls

An easy make and take for Halloween. Take Black basecard. Add a layer of white stamped with sentiment form Border Banter in basic black FIRST then embossed with spider EF.  Stamp the mummy and the spider in black, add a litle shadow on his feet and pretty in pink in his cheeks and add a googly, layer over a black layer and all done.